Si tienes problemas con el gimbal de tu dron DJI (como imágenes de cámara temblorosas, movimientos bruscos o falta de respuesta a la rotación), no te preocupes. Arreglarlo tú mismo suele ser sencillo, sobre todo si sigues los pasos correctos. En esta guía, te explicaremos cómo reparar fácilmente problemas comunes del gimbal en drones DJI como el DJI Mini 4 Pro.
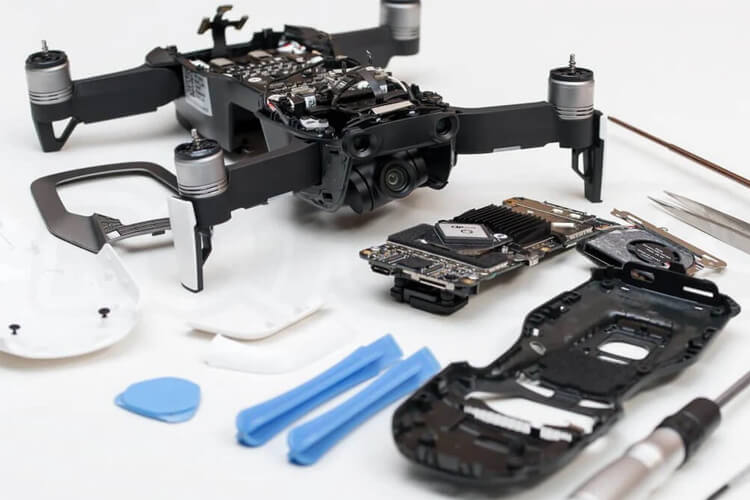
Herramientas que necesitará para la reparación:
Antes de comenzar las reparaciones, reúne estas herramientas para asegurar que el proceso se desarrolle sin problemas y sin causar daños adicionales:
-
Destornillador pequeño de cabeza Phillips: Para quitar tornillos pequeños del interior del dron.
-
Destornillador Torx T5: Necesario para abrir el cuerpo del dron.
-
Espátula de plástico: Ayuda a abrir componentes de forma segura.
-
Pinzas: Ideales para manipular piezas delicadas como conectores.
-
Pistola de pegamento: Útil para volver a unir componentes termosellados.
-
Adhesivos resistentes a las vibraciones (B7000/T-7000/e6000): Ideales para volver a ensamblar piezas de forma segura.
-
Alfombrilla magnética (opcional pero recomendada): Evita que los tornillos se pierdan durante la reparación.
Guía paso a paso para reparar el gimbal de tu dron DJI:
1. Apaga tu dron y prepara tu espacio de trabajo
Empieza por retirar la batería de tu dron. Coloca el dron sobre una superficie antiestática, como una alfombrilla magnética, para evitar perder algún tornillo durante el proceso.
2. Retire la tapa superior
Utilice el destornillador Torx T5 para quitar los cuatro tornillos que sujetan la tapa superior. Luego, con cuidado, haga palanca alrededor de los bordes con una espátula de plástico para levantar la tapa. Tenga cuidado con las pestañas, ya que son delicadas y pueden romperse si tiene prisa.
3. Desconecta el cable del gimbal
A continuación, localiza el cable de transmisión principal del gimbal conectado a la placa base. Normalmente, está sujeto por una pequeña abrazadera metálica. Desatorníllala y, con unas pinzas, retira con cuidado el adhesivo que sujeta el cable. Ten mucho cuidado al desconectarlo, ya que es frágil.
4. Retire los soportes de goma
Probablemente encontrarás amortiguadores de goma que sujetan el cardán. Estos pueden romperse en caso de impacto, pero son fáciles de reemplazar. Usa pinzas para extraer con cuidado los amortiguadores, pasándolos por los orificios del marco.
5. Reemplazar o reparar las piezas dañadas
Dependiendo de la magnitud de los daños, tienes dos opciones:
-
Sustituya todo el conjunto del cardán, o
-
Sustituye componentes individuales como el motor de balanceo, el motor de guiñada, el módulo de la cámara o el cable de transmisión.
En mi experiencia, a menudo basta con sustituir únicamente el motor de balanceo, lo que ahorra tiempo y evita la necesidad de una recalibración completa.
6. Vuelva a ensamblar y asegurar todo
Una vez reemplazadas las piezas dañadas, comienza a volver a ensamblar el gimbal. Recomiendo usar pegamento B7000 para fijar los conectores y asegúrate de aplicar pasta térmica nueva debajo del disipador. Alinea cuidadosamente los orificios de los tornillos y apriétalos, pero evita apretarlos demasiado para prevenir daños.
7. Vuelva a colocar el cardán en su sitio.
Vuelva a colocar los soportes de goma en su sitio. Puede resultar complicado, así que utilice unas pinzas para ayudarle a sacarlos mientras empuja suavemente desde el otro lado. Una vez que el gimbal esté bien sujeto, vuelva a conectar los cables y encaje la carcasa superior. Compruebe que todo esté alineado antes de apretar los tornillos.
8. Encienda y pruebe el gimbal
Enciende tu dron y conéctalo al control remoto. Verifica que el movimiento del gimbal sea fluido y que la imagen de la cámara sea estable. Si persisten los problemas, es posible que debas realizar una calibración manual, pero ten en cuenta que esto no se realiza a través de la aplicación DJI Fly.


