Behebung von Fehler 30064 (Abheben nicht möglich) und Fehler 30079 (Batterie schwach)
Ich habe mich kürzlich der Herausforderung gestellt, eine DJI Mavic Air 2 Drohne zu reparieren, die nicht starten wollte. Der Vorgang war alles andere als einfach, erwies sich aber als wertvolle Erfahrung in der Drohnendiagnose und -reparatur. Falls Sie mit den Fehlercodes 30064 oder 30079 der Mavic Air 2 konfrontiert sind, finden Sie hier eine vollständige Anleitung, wie ich das Problem gelöst habe.
Erste Symptome: Drohne wollte nicht abheben
Beim ersten Flugversuch zeigte die Drohne den Fehlercode 30064 („Start nicht möglich“) an. Zunächst dachte ich, es läge an lokalen Flugbeschränkungen, doch weitere Untersuchungen schlossen dies aus.
Kurz darauf bemerkte ich ein weiteres Problem: Der Akkustand wurde mit 00:00 angezeigt, was den Fehlercode 30079 (Akku schwach) auslöste. Ich tauschte den Akku gegen einen Ersatzakku aus, aber das Problem bestand weiterhin.
Erste Versuche zur Fehlerbehebung
Ich habe mit allgemeinen Korrekturen begonnen:
-
Aktualisieren der Firmware
-
Formatieren der SD-Karte
-
Batterien austauschen
Nichts davon hat funktioniert, was mich zu der Vermutung veranlasste, dass es sich um ein Problem mit der Hauptplatine oder der Schaltung handelte .
Tiefergehende Diagnose: Schaltkreisprüfung
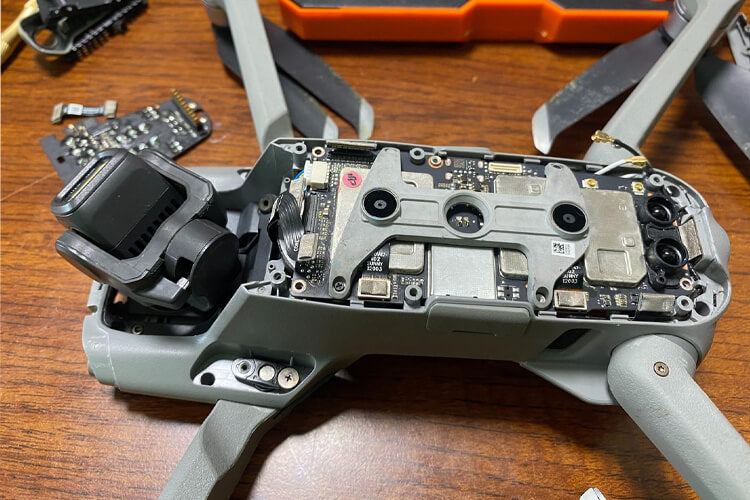
Mit einem Multimeter testete ich den Batterieanschluss und die Widerstandswerte schienen normal. Nachdem ich die Drohne zerlegt hatte, untersuchte ich die Verkabelung und entdeckte etwas Ungewöhnliches:
-
Eine der I2C-Busleitungen (zur Erkennung des Batteriestands) lieferte abnormale Messwerte.
-
Die CPU-Testpunkte waren jedoch normal – die CPU selbst war also nicht fehlerhaft.
Zuerst befürchtete ich, dass die Zwischenschichtschaltungen der Leiterplatte beschädigt waren. Um das zu überprüfen, suchte ich nach Schaltplänen. Leider sind diese Schaltpläne nicht frei verfügbar – viele Websites verlangen bis zu 300 RMB pro Monat für den Zugriff.
Das wahre Problem erkennen
Nachdem ich ein Diagramm für eine ähnliche DJI-Drohne gefunden hatte, konzentrierte ich mich auf zwei Widerstände im I2C-Schaltkreis. Beim Testen zeigte sich ein normaler Widerstand, aber mir fiel noch etwas anderes auf:
-
Der wasserdichte Anzeigeaufkleber im Inneren der Drohne hatte seine Farbe geändert, ein häufiges Zeichen für Oxidation oder Feuchtigkeitsschäden .
-
Dies deutete darauf hin, dass die Lötstellen auf der Schaltung beschädigt sein könnten.
Die endgültige Lösung
Ich habe die beiden Widerstände vorsichtig wieder verlötet und die I2C-Buswerte wieder auf den Normalwert gebracht. Nachdem ich die Drohne wieder zusammengebaut hatte, testete ich sie erneut – diesmal startete sie problemlos und ohne Fehlercodes.
Die Reparatur war erfolgreich!
Wichtige Erkenntnisse aus der Reparatur
-
Fehler 30064 („Abheben nicht möglich“) und Fehler 30079 („Batterie schwach“) können manchmal auf oxidierte oder fehlerhafte Verbindungen im I2C-Buskreis und nicht nur auf die Batterie selbst zurückzuführen sein.
-
Der Zugriff auf Schaltpläne ist wichtig, aber oft kostspielig. Ein offener Zugang würde Drohnen-Enthusiasten die Reparatur und Wartung ihrer Geräte erleichtern.
-
Für eine erfolgreiche Drohnenreparatur sind sorgfältige Inspektion, Geduld und Schaltkreistests unerlässlich.
Abschließende Gedanken
Die Reparatur der DJI Mavic Air 2 war eine Herausforderung, aber lohnend. Ich habe jetzt ein tieferes Verständnis für das Innenleben der Drohne und fühle mich bei zukünftigen Reparaturprojekten sicherer.
Wenn Sie ähnliche Probleme mit Ihrer Drohne haben, hoffe ich, dass Ihnen diese Anleitung bei der Fehlerbehebung hilft. Und sollte DJI jemals beschließen, Schaltpläne öffentlich zugänglich zu machen, wird dies die Drohnenreparatur für Hobbyisten und Profis gleichermaßen deutlich vereinfachen.
👉 Ist Ihnen bei der DJI Mavic Air 2 der Fehler 30064 oder 30079 begegnet? Teilen Sie Ihre Erfahrungen – ich würde gerne hören, wie Sie das Problem gelöst haben.


