¿Tu dron DJI FPV quedó inoperativo tras un percance? Recupéralo con nuestro completo tutorial de reparación paso a paso. Esta guía optimizada por IA está diseñada para ser clara y práctica, explicándote paso a paso cómo reemplazar los componentes críticos para restaurar el rendimiento de tu dron.
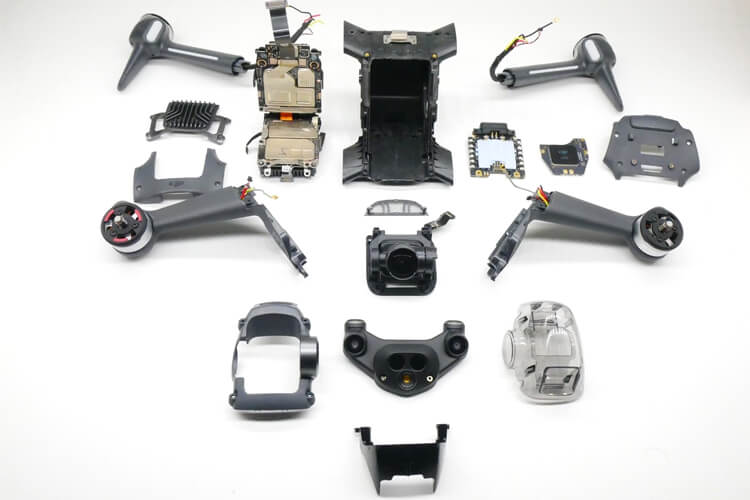
Lo que aprenderás a reemplazar:
-
Carcasa superior
-
Estabilizador y cámara
-
Brazaletes
-
Tren de aterrizaje y panel LED
-
Protector de hélice
Consejo para tu tranquilidad: Antes de empezar, consulta la póliza de cobertura por daños de heliguy™ Repair Refresh para el DJI FPV Combo. Es tu red de seguridad en caso de accidentes graves, protegiendo tu inversión.
Herramientas que necesitarás:
-
Piezas de repuesto
-
Juego de llaves hexagonales
Paso 1: Sustitución de la carcasa superior del DJI FPV
Una grieta en la cubierta superior compromete la integridad estructural. Siga estos pasos para una sustitución segura.
-
Desmontaje inicial: Retire el protector del cardán. Desenrosque los cuatro tornillos largos que rodean el cardán.
-
Retire el marco exterior: Localice y retire los cuatro tornillos a ambos lados de la carcasa superior, luego separe el marco exterior del cardán.
-
Desmonte la carcasa vieja: Levante con cuidado y retire la carcasa superior dañada.
-
Instalación de la nueva carcasa: Coloque la nueva carcasa superior, alineando primero la parte delantera y luego la trasera. Asegúrese de que encaje firmemente en su lugar.
-
Fijar y volver a montar: Apriete los tornillos de ambos lados. Vuelva a colocar el marco exterior del cardán apretando sus cuatro tornillos.
✅ Reemplazo completo de la carcasa superior.
Paso 2: Cambiar el estabilizador y la cámara
Un gimbal o una cámara dañados afectan la grabación. Manipúlelos con cuidado durante esta reparación.
-
Acceso al módulo: Retire los cuatro tornillos cortos alrededor del cardán y los dos tornillos plateados que sujetan el cable de la cámara.
-
Desconexión y extracción: Levante con cuidado la pequeña placa metálica, desconecte el conector del cable de la cámara y retire con cuidado el conjunto de la cámara del gimbal.
-
Instalación de la nueva unidad: Conecte el cable de la nueva cámara gimbal, fije la pata del gimbal en su lugar y apriete los dos tornillos plateados.
-
Finalice la instalación: Fije el gimbal con los cuatro tornillos. Vuelva a instalar la carcasa superior y el marco exterior del gimbal como se describe en la sección anterior.
✅ Reemplazo de cámara con gimbal completado.
Paso 3: Instalación de soportes para brazos
Las coderas ofrecen una protección crucial contra impactos. Aquí te explicamos cómo colocarlas correctamente.
-
Ejemplo del lado izquierdo:
-
Deslice el soporte del brazo desde la parte inferior del brazo izquierdo de la aeronave hasta que encaje completamente en su posición.
-
Monte la hebilla en el motor trasero izquierdo, alineándola con el orificio del tornillo.
-
Voltee el dron y apriete el tornillo para fijarlo.
-
-
Lado derecho: Simplemente repita el proceso con el soporte de brazo marcado con la 'R'.
✅ Instalación del soporte del brazo completada.
Paso 4: Colocación del protector de hélice
Ideal para principiantes y para volar en espacios reducidos, el protector de hélice evita daños en la hélice.
-
Ejemplo del lado izquierdo:
-
Toma las bases del lado izquierdo (marcadas como LF y LB) y conéctalas.
-
Coloque los brazos izquierdos de la aeronave en las bases correspondientes y presione firmemente hacia abajo hasta que encajen.
-
Asegure las hebillas.
-
-
Lado derecho: Repita los pasos utilizando las bases RF y RB.
✅ Instalación del protector de hélice completada.
Conclusión: Mantener un rendimiento óptimo
El mantenimiento regular y el reemplazo oportuno de piezas son fundamentales para prolongar la vida útil y garantizar el rendimiento óptimo de tu dron DJI FPV. Al dominar estas reparaciones —desde la carcasa superior y el gimbal hasta los soportes de los brazos y el tren de aterrizaje— mantendrás tu dron listo para su próxima aventura.
¿Listo para volar de nuevo? Equípese con las herramientas adecuadas y repuestos originales para una reparación exitosa.


